


|
One of the most powerful features of Iron Speed Designer is the ability to create and use reusable panels and components. For example, a header, footer and menu panel can be included on every page of an application. Reusable panels allow the definition of the panel in one place and pages simply refer to these panels. Changes only need be made once to the panel and will be reflected on all pages that use the panel. This allows you to consolidate the most common aspects of your application into one location and reuse them as often as necessary.
Reusable panels are simply fragments of a page and are created as ASCX controls instead of ASPX pages. Just like a page, they are configured through the Property Sheet. Once created they are referred to by other pages and panels via the GEN:Use code generation tag.
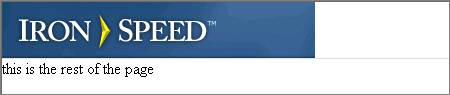
Reusable panels can be either completely independent or they can be dependent on the page or panel that includes them. For example, the header panel typically is a completely independent panel containing a logo, and other images. However, while a reusable button panel specifies the layout, the page or panel incorporating the button specifies the actual button label, the action to take, and the destination URL. The immediate parent provides any additional information needed by the dependent panel.
Reusable panels can be nested as deeply as you like. For example, a reusable button panel might be included in the reusable Footer panel that is included on each page. There is no limitation on the number of levels of nesting. However it is not possible to nest a reusable panel within the same panel. For example, you cannot add a footer panel within the same footer panel; this will cause compilation errors due to the circular panel reference.
Reusable panels also provide flexibility in naming. The names of code generation tags used within a panel will not conflict with any names within the page or panel that uses them. The names must be unique within a page or panel, but not across multiple pages or panels.
To create a reusable panel
Step 1: Place your reusable ASCX control file in a subfolder of your application such as \MyApp\MyASPXControls. Make sure the file has an .ASCX extension.
Step 2: In Iron Speed Designer, select View, Refresh to display this new file in the Application Explorer.
Step 3: In the Application Explorer, select the newly added file and select the top page-level panel.
Step 4: In the Property Sheet, change the “Page type” property to “Custom ASCX control”.
|
Group |
Property |
Setting |
|
Page |
Page type |
Custom ASCX control |
Step 5: Press OK to save.
Step 6: Build your application.
To use a reusable panel
To use a reusable ASCX panel on another page:
Step 1: Use the Application Explorer to open the page where you want to use the panel.
Step 2: In Layout Editor, drag an Include ASCX Component from the Toolbox onto the page at the location where you want the panel.
Step 3: IMPORTANT: Configure the newly added component via the Property Sheet:
|
Group |
Property |
Setting |
|
Page |
Page type |
Custom ASCX control |
|
Control |
ASCX file path |
..\MyApp\MyASPXControls\MyControl.ascx |
Step 4: IMPORTANT: Rebuild your application (Build, Rebuild All). This creates the associated code for the newly added control.
Your panel should now be displayed as part of the enclosing web page with the same look and feel as the rest of your application.
Example: Creating a reusable header panel
A header is typically an independent reusable panel that can be included in every page created. As an example, here’s how to create the reusable header panel:
Step 1: Create a standard web page via the Application Wizard as you normally would any page.
Step 2: In the Application Explorer, select the newly added file and select the top page-level panel.
Step 3: In the Property Sheet, Page section change the “Page type” property to ‘Header ASCX control’.
|
Group |
Property |
Setting |
|
Page |
Page type |
Header ASCX control |
Step 4: Set the properties for various controls on the page as desired. For example, you might set a Logo tag’s URL property.
|
Group |
Property |
Setting |
|
|
Control name |
Logo |
|
Appearance |
ImageUrl |
http://www.ironspeed.com/art/logo.gif Any URL you wish. |
The ASCX panel is now ready to be included in a page. To include this panel on a page:
Step 1: Using Application Explorer, open the page where you wish to add the ASCX panel.
Step 2: In Layout Editor, navigate to the page area where you wish to add the ASCX panel.
Step 3: Drag an Include ASCX Component from the Toolbox onto the page and select the newly added control.
Step 4: In the Property Sheet, set the ‘ASCX file path’ property to the newly created header panel file.
|
Group |
Property |
Setting |
|
Control |
ASCX file path |
MyHeader.ascx |
Step 5: Build and run the application and view the page.
Example: Creating Button Panels
Enhancing applications with standard buttons that do standard things is often a tedious and time-consuming task. Iron Speed Designer can greatly simplify, and largely automate, this mundane task. For example, Iron Speed Designer supports four types of buttons. The Push Button, Link Button and Image Buttons create standard HTML buttons based on the Button, <a href> and <img> HTML tags. A fourth type of button supported by Iron Speed Designer is a button that is created using HTML layout. This button can be used by dragging an Include ASCX Component from the Toolbox onto your page.
You can create many different types of buttons using HTML layout and use them on your page. For example, you can create a Red button and a Green button and use them multiple times on a single page. The button panel file may contain the complete property settings for the button including the label text, the URL and the command to execute. By setting the button properties completely, the button actually becomes a specific button and not reusable to create multiple buttons with different labels, URLs and commands. To allow reusability, Iron Speed Designer supports the ability to set some properties of the button at the page or panel that incorporates the button.
To create a reusable button:
Step 1: Create a new ASCX control by right-clicking on any node on the Application Explorer. Rename this file to “RedButton.ascx”.
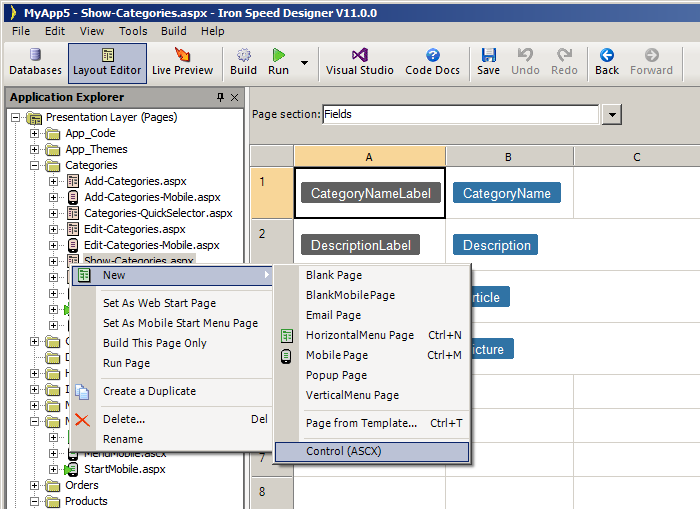
Step 2: Create a Link button within the newly created ASCX file. Select the first cell on the Layout Editor. In the HTML Editor enter:
“GEN:LINKBUTTON Name=“Button”/>“
Step 3: Set these <table> style attributes in the Tag Attributes dialog (Right-click, Styles, Table…).
cellpadding : 3
cellspacing : 0
border : 1
bordercolorlight : #C0C0C0
bordercolordark : #808080
style : border-collpas:collapse
bgcolor : #808080
Step 4: Set these <td> style attributes in the Tag Attributes dialog (Right-click, Styles, Cell…).
color : #FFFFFF
font-family: Verdana
font-size: 10px
Font-weight: bold
text-decoration: none
text-align: center
padding-left: 3px
padding-right: 3px
Step 5: Set the Control Type property via the Property Sheet. However, do not set the Text, ImageUrl or Button Action properties for the Button control.
|
Group |
Property |
Setting |
|
|
Control name |
Button |
|
Control |
Control type |
Button ASCX Panel |
|
Control |
Button actions |
Leave unset |
|
Appearance |
Text |
Leave unset |
|
Appearance |
ImageUrl |
Leave unset |
Step 6: Build the ASCX control (Build, Build).
Your button control is ready to use. To include this panel on a page:
Step 1: Use Application Explorer to open the page where you wish to add the new button panel.
Step 2: In Layout Editor, select the page area where you wish to add the button panel.
Step 3: Drag an Include ASCX Component from the Toolbox onto your page in the Layout Editor.
Step 4: In the Property Sheet for the newly added Include ASCX Component, select the ASCX panel:
|
Group |
Property |
Setting |
|
|
Control name |
Include |
|
Control |
ASCX file path |
RedButton.ascx |
|
Custom properties |
Button-CommandName |
Redirect |
|
Custom properties |
Button-Consumers |
Page |
|
Custom properties |
Button-Text |
My Button |
|
Custom properties |
Button-RedirectURL |
http://www.ironspeed.com |
Step 5: Build and run the application and review the buttons displayed.
