


|
Classic Theme Example: Set Application Page Width
Updated March 26, 2010
Iron Speed Designer Version 7.0 and later
You can control the width of a page and its horizontal-alignment within the browser.
Basic approach
Step 1: In Application Explorer, open your application’s master page (HorizontalMenu.master, VerticalMenu.master, etc.) and switch to Layout Editor.
Step 2: In the Page Directives dialog (Right-click, Page Directives…) add this HTML code to the end of the Prolog section:
<table cellspacing="0" cellpadding="0" border="0" class="pbTable">
<tr>
<td>
And add this HTML to the top of the Epilog section:
</td>
</tr>
</table>
Step 3: Copy the pbTable class from BaseStyles.css to Styles.css so you can customize the class. Classes defined in Styles.css automatically override those in BaseStyles.css.
Step 4: In Styles.css, add a “width” attribute to the pbTable class. By default, the pbTable class does not contain a width attribute, so it defaults to 100% of the width of the browser. You can add a width attribute to set the page width.
.borderTable, .pbTable { /* page content container */
width: 600px;
}
Note that width specifications are only taken as “suggestions” by the browser, and the page width will actually depend upon the content within the table grid.
Step 5: Build and run your application.
Centering the page
Similarly you can center the page within the browser using margin-left and margin-right properties.
.borderTable, .pbTable { /* page content container */
margin-left: auto;
margin-right: auto;
}
An alternative, but more flexible solution
A more complicated but flexible approach is to modify your master page using the Layout Editor, using the Tag Attributes dialog to add the desired page width and centering styles.
Step1: In Application Explorer, open your application’s master page (HorizontalMenu.master, VerticalMenu.master, etc.) and switch to Layout Editor.
Step 2: Add a new (empty) column to the left of column A. Then, drag a “Blank Panel No Header” panel from the Toolbox into the top left cell of the master page.
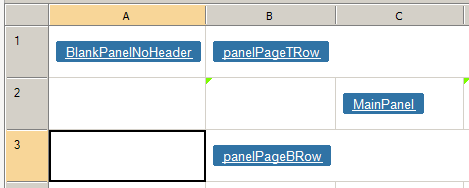
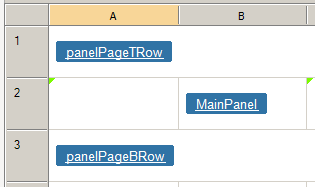
Step 3: Move all pre-existing content on the master page into the newly added blank panel, leaving only the newly added blank panel as the only content at the master-page’s top level. This is easily accomplished by cutting the pre-existing content (select cells, Ctrl-C), zooming into the new blank panel and pasting (Ctrl-V) the ‘cut’ content into the new blank panel.
Step 4: In the newly added panel (now containing the page contents), add these attributes via the Tag Attributes dialog (right-click, Styles, Table…):
|
Attribute |
Value |
|
border |
0 |
|
cellpadding |
0 |
|
cellspacing |
0 |
Step 5: Zoom back out to the top-level of the master page containing the single newly added panel. Use the Tag Attributes dialog (right-click, Styles, Table…) to set the appropriate class and other desired style attributes, e.g.:
|
Attribute |
Value |
|
class |
pbTable |
Step 6: Copy the pbTable class from BaseStyles.css to Styles.css so you can customize the class. Classes defined in Styles.css automatically override those in BaseStyles.css.
Step 7: In Styles.css, customize the pbTable class as needed to achieve the page width or page centering result you desire.
Step 8: Build and run your application.
This approach allows you to to easily add, modify and remove styles.