


|
Button Actions
This property group configures individual button behavior. Button actions determine what action is taken when a button is clicked. Several button styles are supported, including:
Image Button. You can display an Image Button whose text is extracted from the database.
Link Button. The Link Button displays a hypertext link button whose text is retrieved from the database.
Push Button. The Push Button displays a push button whose text is retrieved from the database.
While there are several button types, they share the same properties.
|
Property |
Description |
|
Actions |
Specify actions to take when a button is clicked. See Actions for details. |
|
Redirect |
Configure page redirection action to take when button is clicked. See Redirect for details. |
|
Send email |
Configure email(s) to send when button is clicked. See Send Email for details. |
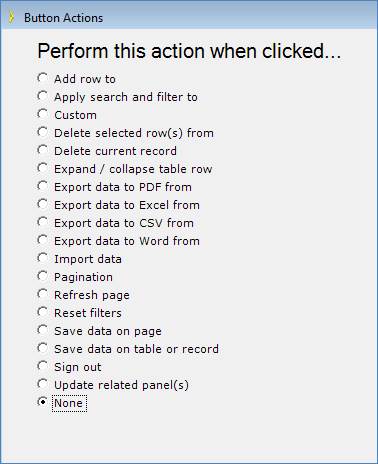
Actions
|
Action |
Description |
|
Add row to |
Add a new record to the database. Processing does not wait until a final “Submit” or “OK” button is clicked. |
|
Apply search and filter to |
Applies the current filtering criteria, including a search, to the control. This operation is normally used for the “Go” button in a search panel or a dropdown filter. The search term is entered into a separate text box field. |
|
Custom |
An application-defined custom command is executed when the button is clicked. When clicked, the button will emit an event by this name, which can be intercepted in a code extension to your application and processed. See Calling a custom function when a button is clicked for details. |
|
Delete current record |
In Show Record panels, the selected record is deleted from the database immediately. Processing does not wait until a final “Submit” or “OK” button is clicked. In Edit Record panels, the selected record is removed from the control so that it is no longer displayed. The record is deleted from the database and the transaction committed only after a final “Save”, “Submit” or “OK” button is clicked. Note: The ‘Delete current record’ command will only delete the designated record. It will not delete related records that refer to the deleted record. See Deleting related records for details. |
|
Delete selected row from |
In Table Report panels, the selected record(s) are deleted from the database immediately. Processing does not wait until a final “Submit” or “OK” button is clicked. In Edit Table panels, the selected record(s) are removed from the control so that they are no longer displayed. The record(s) are physically deleted from the database and the transaction committed only after a final “Save”, “Submit” or “OK” button is clicked. Note: The ‘Delete selected row from’ command will only delete the designated record(s). It will not delete related records that refer to the deleted record(s). See Deleting related records for details. |
|
Export data to PDF from |
Create a PDF report using data from the associated table. A file selection dialog is displayed when the button is clicked, prompting the application user for a file name. |
|
Export data to Excel from |
Create a Microsoft Excel file containing data from the associated table. A file selection dialog is displayed when the button is clicked, prompting the application user for a file name. |
|
Export data to CSV from |
Create an ASCII CSV file containing data from the associated table. A file selection dialog is displayed when the button is clicked, prompting the application user for a file name. |
|
Export data to Word from |
Create a Microsoft Word report using data from the associated table. A file selection dialog is displayed when the button is clicked, prompting the application user for a file name. |
|
Import data from |
Imports data into the selected table from ASCII CSV, Microsoft Excel and Microsoft Access files. A wizard is displayed when the button is clicked, prompting the application user for a file name and other details. You must specify a ‘Go to specific URL’ action (via the Button Action Wizard) to launch the Import Wizard and designate the database table to receive the imported data. The URL has the format: ../Shared/SelectFileToImport.aspx?TableName=Categories SelectFileToImport.aspx is the Import Wizard. ‘Categories’ is an example of the database table receiving the imported data. |
|
Pagination |
|
|
Refresh page |
Restores the current page (or form) to its last presented state. For Add Record pages, the input fields are cleared of any data entered into them. For Edit Record pages, the data fields are restored to their original values from the database. Refresh page causes record controls and table controls to refresh their data from the database, even if the fresh data was from a concurrent modification by another user. I.e., the most current data is always retrieved from the database. It does not restore from the web browser’s local cache. Note: Refreshing a page does not reset the filter settings or clear the search text box. To clear the filters and search text box, simply redirect to the same page using the “Go to a specific URL” Button Action option. |
|
Save data on page |
Any input data and edited values on the page are updated (saved) into the database. Any deleted records are removed from the database. |
|
Save data on table or record |
Any input data and edited values in the selected table or record are updated (saved) into the database. Any deleted records are removed from the database. |
|
Sign out |
Sign out of the application. The application user is logged out. The Sign Out event is always consumed by the Page unless some form of code customization is employed relating to this event. |
|
Update related panel(s) |
Button triggers post back on the related panel (such as Enhanced table with detail below) |
|
None |
Button does not trigger any action |
Several of the Action options require additional options to be specified.
|
Option |
Description |
|
Enable client-side data validation |
The data entered into the page is validated by the application. All data in each data entry control on the page is validated. |
Deleting related records
Sometimes when using the Delete Current Record action, you may see this error in your application:
"Cannot delete Main. A record you were attempting to modify is referenced by other records."
This happens because the Delete Current Record action does not recursively delete all the records in other tables that reference the deleted record. For example, if an Order Detail record points to the main Order record, the Order record cannot be deleted unless the Order Details records that reference the particular Order record are deleted.
You can accomplish this in several ways.
-
If you are using Microsoft SQL Server, enable the "Cascade Delete Related Fields" feature through Enterprise Manager. Microsoft SQL Server will automatically remove the related records.
-
Delete the related records (e.g., Order Detail records) through your application before deleting the master record (e.g., the Order record).
-
Customize your application code to delete the Order Detail records before deleting the Order record. Do this by overriding the DeleteRecord method in the TableControl class. When overriding this method, delete the other (Order Detail) records first before calling the base DeleteRecord method:
Public Overrides Function DeleteRecord(ByVal recordIndex As Int32) As IRecord
To delete the OrderDetail records, write a simple “for” loop that goes through each record and calls the Delete method on each record. Retrieve the record group using the GetList method.
Redirect

Linking Add, Edit, Show Record, and Table Pages
You may want to link together several pages after creating them with the Application Wizard. In particular, Table Report pages contain Edit and Show buttons as placeholder links to Edit Record and Show Record pages you may want to connect. However, these links are not connected and clicking them results in a “page not found” error.
Step 1: Use the Application Wizard to create these Add, Edit and Show Record pages.
Step 2: Use the Property Sheet to connect the unbound buttons using the Button Actions properties.
Step 3: Build and run your application.
|
|
The Table Report pages created by the Application Wizard contain Edit and Show icons (notepad and magnifying glass, respectively) that are not connected to pages. You may optionally remove the Edit and Show buttons, or connect them to pages. |
Send Email
Email Addresses
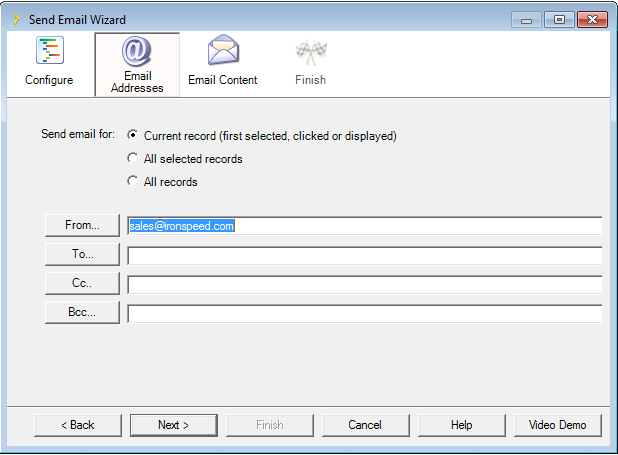
The Email Addresses step specifies which records to use when sending the email(s) and which email addresses to use.
When the button containing this action is within a Record control, an email can be sent only for the current record. If the button containing this action is within a Table control, an email can be sent for each selected record or for all records. Please note that ‘All records’ includes records that may not be currently displayed on the page. For example, if the filtered set includes 50 records but only 10 are currently displayed on the page, selecting this option will send emails for each of the 50 records.
|
Options |
Description |
||||||
|
Send email for |
Send email for selected set of records. There are 3 options available:
|
You can enter only one “From” email address since an email may have only one sender. If you already have an email address in the From field, press the From... button to edit the existing email address. If the From field is empty, press the From... button to add a new email address.
|
Options |
Description |
|
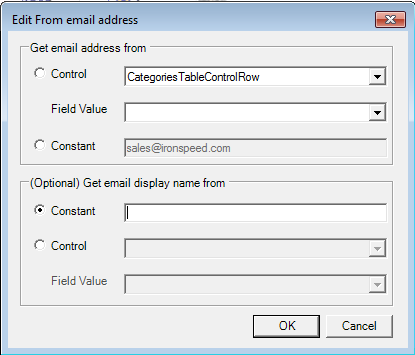
Email address |
An email address can be a simple text string, a substitution variable or a field value. Text string email addresses are used exactly as specified in the Constant field. Substitution variables are placed in the Constant field and are evaluated after the button click at application run-time. When evaluated, a data value is substituted for the substitution variable. See Button Actions - Substitution Variables for further details on how substitution variables are handled. |
|
Email display name |
The email display name is optional. If nothing is specified, the display name is the same as the email address. Display names can be simple text strings, a substitution variable or a field value. Substitution variables are placed in the Constant field and are evaluated after the button click at application run-time. When evaluated, a data value is substituted for the substitution variable. See Button Actions - Substitution Variables for further details on how substitution variables are handled. |
Email Content
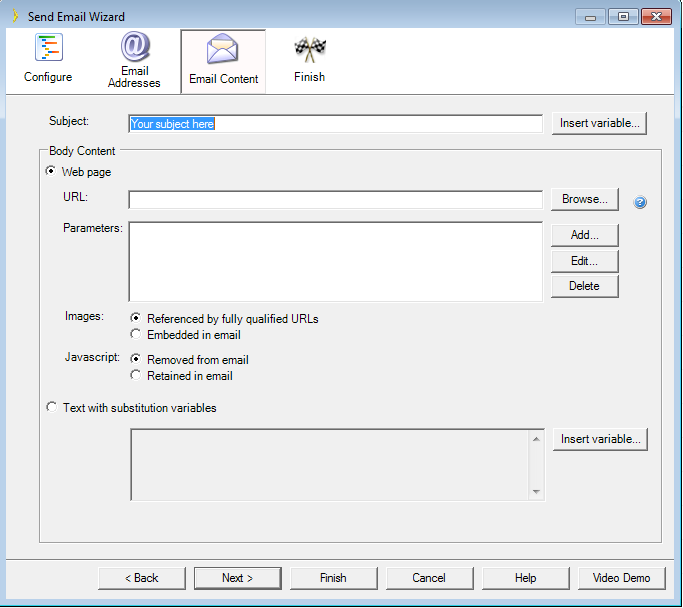
The Email Content step specifies the body and content of the email.
|
Options |
Description |
||||
|
Subject |
Specifies the email’s subject line. Use the “Insert variable...” button to insert substitution variables into the subject line text. The substitution variable will be evaluated at application run-time after the button click and data from the table or record control substituted in place of the variable. |
||||
|
Body Content |
|
||||
|
Images |
Specifies how to display images used in the email body.
|
||||
|
Javascript |
If your email content contains javascript, the email has a greater chance to be filtered and put into the spam folder. Therefore you have an option to remove or retain javascript when emailing. The default selection is 'Removed from email'. |
When the content of an email is sourced from a URL, your web server must retrieve the page at that URL at run-time. The retrieval of the URL content occurs in a separate session from the one used to process the page.
When the application uses URL encryption, the default encryption key is generated using the session ID of the current session. Since the encryption of the URL and its decryption occur in different sessions, the URL parameters cannot be successfully decoded using the default encryption key. This can be fixed by removing the session ID as a component of the encryption key used by the application.
To use encrypted URL parameters while sending email from the application, modify the GetCryptoKey() function in the Crypto class of the Data Access Layer of the application as follows:
Private Function GetCryptoKey() As String
Return BaseClasses.Configuration.ApplicationSettings.Current.URLEncryptionKey
End Function
Since the encryption key does not rely on the session ID, the URL parameters can be decrypted in a different session than where they were encrypted.
Finish
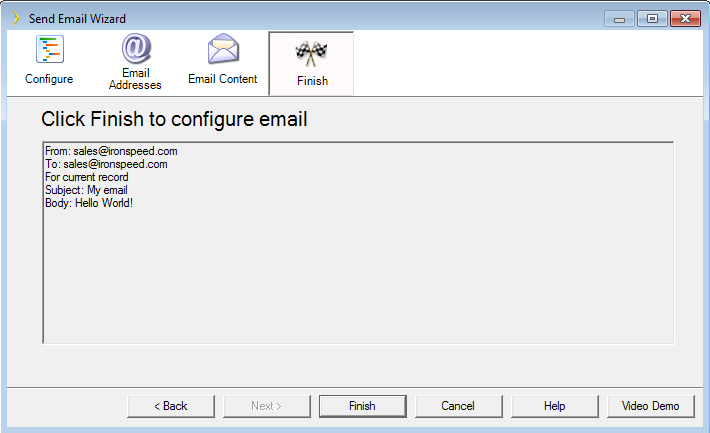
The Finish step shows a summary of the button actions to be added.