


|
Application code created by Iron Speed Designer is designed to work directly with Microsoft Visual Studio .NET. Iron Speed Designer creates standard Microsoft .NET applications that can also be opened and modified using Microsoft Visual Studio. While there is no requirement to use Microsoft Visual Studio or even have it installed on your machine, you can benefit from using Microsoft Visual Studio for customizing code in certain cases. Each product has its benefits and they complement each other in a number of ways such as:
Iron Speed Designer Benefits:
-
Page/Panel versus Control/Line of Code: Iron Speed Designer allows you to create a page or panel at a time, while Microsoft Visual Studio allows you to create code one line or one control at a time.
-
Spreadsheet-like Layout Editor: You can customize the layout of the page using an easy to use spreadsheet-like interface in Iron Speed Designer without having to know HTML or ASPX.
-
Pre-bound Panels: Drag-and-drop complete, pre-bound panels such as child tables. The SQL query and the relationship with other panels on the page is automatically configured, and a complete layout is created easily.
-
Pre-bound Controls: Drag-and-drop pre-bound controls from the Toolbox. The controls are automatically formatted to use the right ASP.NET control such as a textbox or dropdown list, and are automatically bound to a field from the database.
Microsoft Visual Studio Benefits:
-
Debugger: Microsoft Visual Studio has an excellent debugger that allows you to debug code easily. Step through the application code to understand it line by line, or identify problems in your code.
-
Intellisense: You can use the full support of Intellisense across all Microsoft .NET libraries and files.
-
Third-party Controls and Libraries: Incorporate other features such as web services, or use third-party controls or libraries easily using Microsoft Visual Studio.
When developing with Microsoft Visual Studio, we recommend the following:
-
Modifying the code in Microsoft Visual Studio will never orphan your application from Iron Speed Designer. As long as you follow our recommended guidelines, your changes will always be preserved.
-
Use Section 1: Place your code customizations in Section 1 of the C# or Visual Basic source code files. Section 2 will be overwritten during the next code generation. You can override any function or method in Section 1 to replace its behavior implemented in Section 2.
-
ASPX pages: We recommend you use Iron Speed Designer’s Layout Editor to modify your page layout. You can insert any ASP.NET controls using the Layout Editor, and you can even drag-and-drop most of the common controls through the Toolbox. Changes you make directly to the ASPX pages outside of Iron Speed Designer will be overwritten the next time you update that page via the Layout Editor.
-
New pages, new code files: If you want to incorporate new ASPX pages that are not dependent on your database, you can easily do so using Microsoft Visual Studio. Open the application in Microsoft Visual Studio and create the page as you would normally. Similarly, you can add any code files or modules using Microsoft Visual Studio.
Please see the topics below for more information.
Opening an Application in Visual Studio .NET
Follow these steps to open an Iron Speed Designer-created application in Microsoft Visual Studio:
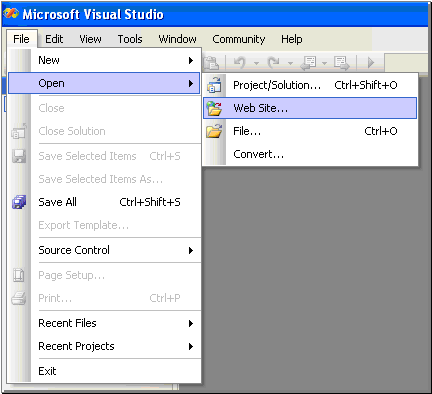
Step 1: In Microsoft Visual Studio .NET, select File, Open, Web Site...
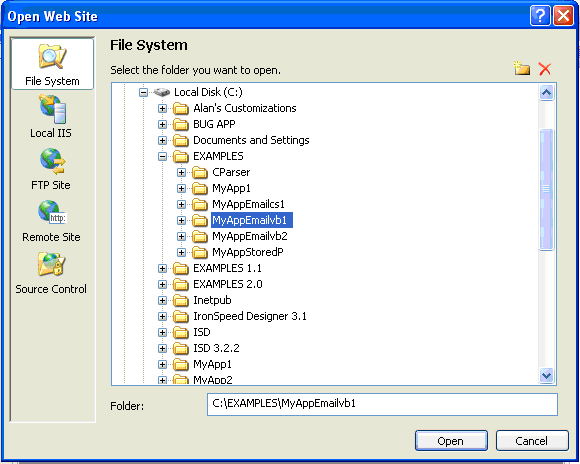
Step 2: Select an application folder and click Open button.
Enabling and Disabling Strict Compilation Mode
You can enable or disable ‘strict mode’ compilation in Visual Studio .NET. Locate the CompileApplication.rsp file in your application folder:
...\<App Folder>\CompileApplication.rsp
CompileApplication.rsp may contain the “optionstrict” tag. To enable strict mode, change this setting to:
/optionstrict+
To disable strict mode, change the setting to:
/optionstrict-
Compiling Applications in Debug Mode
Iron Speed Designer creates a standard .NET application so you can use the debugging features of Microsoft Visual Studio .NET to debug your applications.
Note: Visual Studio .NET requires an application resident on the local machine for debugging purposes.
Step 1: Open your application in Visual Studio .NET.
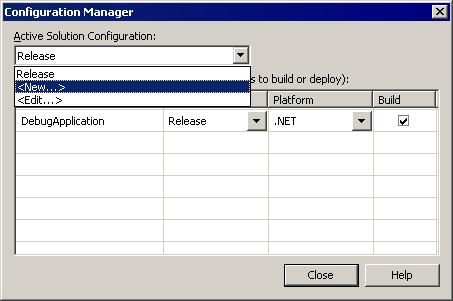
Step 2: In Microsoft Visual Studio, open the Configuration Manager dialog (Build, Configuration Manager).
Step 3: Select a <New...> Active Solution Configuration.
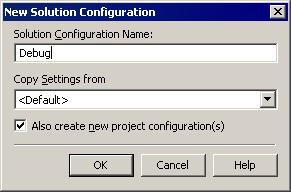
Step 4: Give it a name such as "Debug", and click "OK".
Visual Basic .NET applications
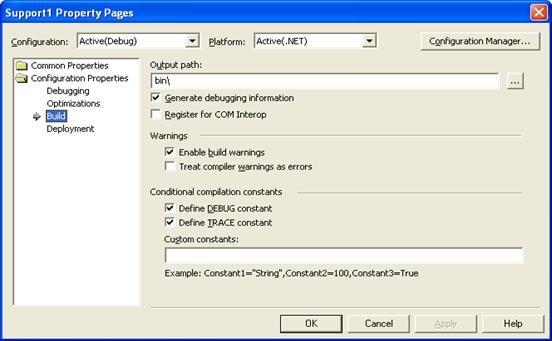
In the Solution Explorer, right-click the solution’s name and select Properties. Then, select the Configuration Properties and the Build option in this group. You will notice a check box titled ‘Generate Debugging Information’ in the panel to the right. Make sure you check this control.
C# applications
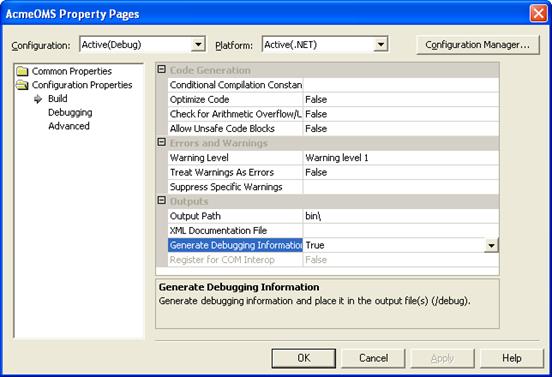
In the Solution Explorer, right-click the solution’s name and select Properties. Select the Configuration Properties and the Build option in this group. You will notice a property titled ‘Generate Debugging Information’ in the panel to the right. Make sure the value for this property is set to ‘True’
Step 5: Click the "Close" button in Configuration Manager. Notice that the project can now be compiled in "Debug" mode via Visual Studio .NET.

Step 6: Change your application’s Web.config file for debugging mode:
<compilation defaultLanguage="c#" debug="true" />
or
<compilation defaultLanguage="vb" debug="true" />
Set compilation debug="true" to insert debugging symbols (.pdb information) into the compiled page. Because this creates a larger file that executes more slowly, you should set this value to true only when debugging and to false at all other times. For more information, refer to the documentation about debugging ASP.NET files.
Note: For faster performance, we recommend your application be compiled in Release mode.